


This is a tool that uses keys (buttons) to learn Morse code and trains you to hit it smoothly.
Simulates a vertical key and a paddle key.
If the length and spacing of each dot and dash, and the speed of the input code are correct, it will be converted to a string.
Set the parameters for key switching and Morse conversion from "Settings".
You can mute the sound and use only LEDs, so you can practice Morse code with light.
For character string conversion, you can switch between English and Japanese with the "Eng" / "JPN" keys.
The display of the code table changes in conjunction with the switching.
For paddle keys, you can enable / disable the key input repeat function.
When this function is enabled, dots and dashes can be entered continuously.
However, this feature requires considerable skill.

Main Display
①▶
②▶
③▶
⑤▶
⑥▶
⑨▶
◀⑦
英字変換モード画面
◀④
◀⑧
◀⑩
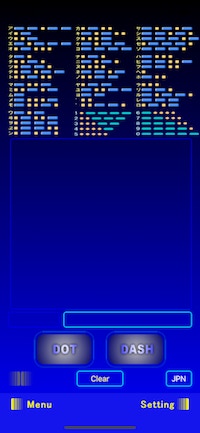
和文変換モード画面
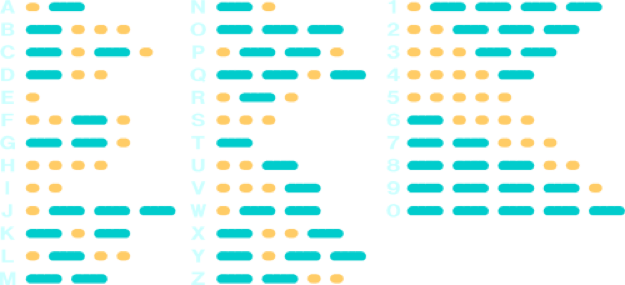
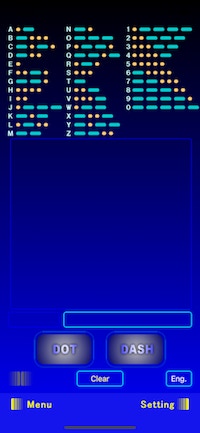
① Morse code table
If you switch the conversion code with ENG / JPN, the code table will also switch.
② Text display section
The character string that was keyed in and converted is displayed.
If the length, speed, and spacing of each dot and dash meet the standards, they will be displayed correctly.
③ Character display unit
The code entered with the key is converted into characters and displayed.
Here, the latest characters are displayed.
④ Morse code
Displays the entered short points / long points.
Even if you intend to hit it as a short point "・", if it is recognized as a long point, it will be displayed as a "-" long point.
⑤ Paddle key (button)
The vertical key and paddle key are switched and displayed (and DOT / DASH).
Switching is done in ⑨ "Settings".
⑥ Indicator light
ON display / OFF display is switched in conjunction with Dot and Dash
⑦ "Clear" button
Initialize the text display, character display, and Morse display.
⑧ "Eng" / "JPN] button
Switch Morse code to alphabet / Japanese.
The Morse code table will also switch in conjunction with it.
⑨ "Menu" button
Switches to the MENU screen (Top Menu) at startup.
⑩ "Setting" button
Moves to the screen for setting the Manual Keyer. → Setting Display
Setting Display
①▶
②▶
③▶
④▶
⑤▶
⑥▶
⑦▶
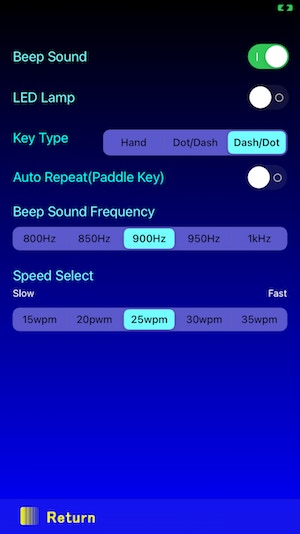

① "Beep Sound" switch
It is an ON / OFF button for Morse code.
② "LED Lamp" switch
If there is an LED light, the button will be enabled and ON / OFF can be set.
For devices without LEDs, this switch is Enable.
③ "Key Type" select
HAND: Vertical key
Dot / Dash: Puddle key (the right side is the long point)
Dash / Dot: Puddle key (the left side is the long point)


④ Select "Auto Repeat (Paddle Key)"
When using a Puddle key, you can input continuously by holding down the key.
It works in conjunction with the code transmission clock. (Is difficult.)
⑤ "Beep Sound Frequency" select
Set the frequency of Morse code.
Please select a sound that is easy to hear.
⑥ "Speed Select" select
In the case of a Puddle key, it will be the code transmission clock.
If you type in according to the character code pattern, Dot and Dash will be automatically generated.
In the case of a vertical key, the short point / long point is calculated from the ON / OFF time and WPS (reference speed).
Recognize, code and convert to characters.
If you do not type it correctly, it will not be written.
⑦ "Return" button
Return to the operation screen (Manual keyer screen).
The changes are automatically saved and will be valid at the next startup.