②▶
◀(2-2)
◀(2-1)
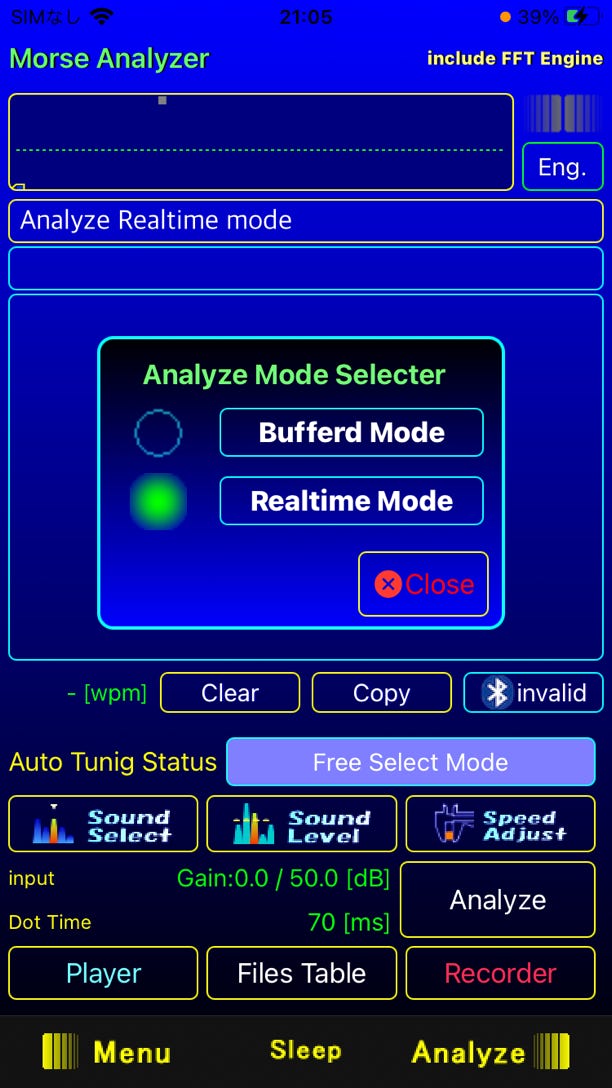
② Analyze mode display
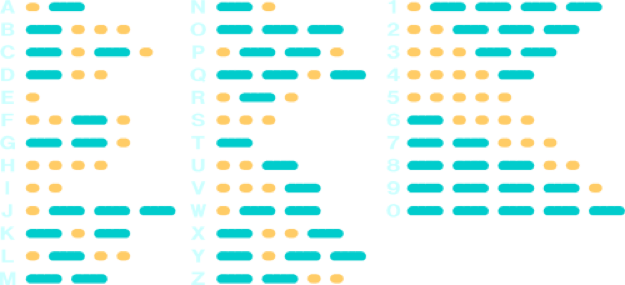
The mode name is displayed when switching modes, and the status is displayed during analysis.
(There are two types of Morse code analysis methods, and the display is different for each.)
Real-Time Analyze Mode (Received sound is converted immediately.) → Visualizes whether the received sound is a short point or a long point or Morse sound.
Bufferd Analyze Mode (Analysis is performed after accumulating ON / OFF data of signal sound) → Displays the numerical value of the accumulation status (accumulated data amount).
Analyze Mode can be switched by opening the (2-2) [Analyze Mode Selecter] Dialog with the (2-1) [Setting] button.
Press each Mode button to switch modes and automatically close Dialog.


NOTE
In Realtime Mode, it is not possible to determine whether the signal that first entered is a dot or a dash, so it is tentatively determined when the signal length is 50 ms.
Therefore, in some cases, "E" may be misinterpreted as "T".
On the other hand, BufferdMode temporarily stores the ON / OFF time of the signal as data, and once the silent signal time reaches 300 ms, it analyzes and analyzes the ON / OFF signal time stored up to that point, so it is easy to determine the first character. there is.
③▶
④▶
⑤▶
⑦▶
◀⑥
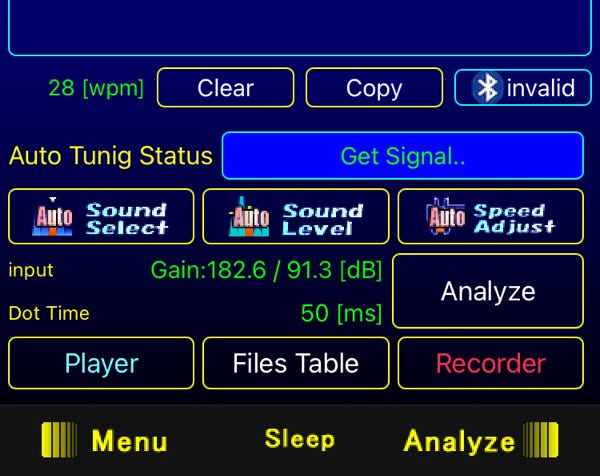
③ Morse conversion monitor display
Displays the analyzed characters (character strings).
④ Character string text box
The parsed character string is displayed in line units.
The latest character string is displayed at the bottom and scrolls automatically.


invalid Bluetooth
Valid Bluetooth
⑥ "Clear" "Copy" ”invalid” /“Valid” button
Clear all the character strings in the "Clear" character string text box and initialize the accumulated data of the Morse conversion monitor and Bufferd Mode.
Since the "Copy" character string is copied, it can be pasted into another application.
⑤ Morse code speed display
Display wpm from the analyzed character string.
Calculated based on the speed of PARIS wpm.
Depending on the Bluetooth device, howling may occur in the speaker
Since the microphone on the main unit cannot be used, Analyzer can set ON/OFF of Bluetooth independently, but this setting is invalid in AutoKeyer and ManualKeyer.
Depending on the Bluetooth device, howling may occur in the speaker
Since the microphone on the main unit cannot be used, Analyzer can set ON/OFF of Bluetooth independently, but this setting is invalid in AutoKeyer and ManualKeyer.
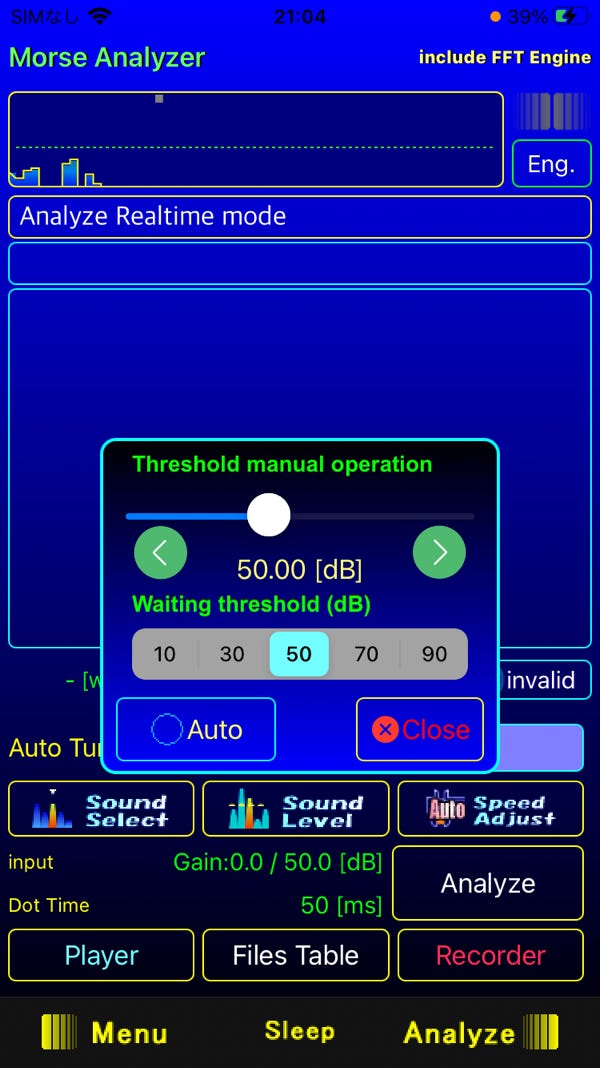
⑦ Auto Tuning Status
Displays the status of Sound Select (points to be analyzed in the range).
Analyzer OFF

When analysis is turned off with the "Analyze" button
This is the display when analysis is automatically turned off when the function is switched.
[Sound Select AUTO ON] (Auto Detected)
in Waiting..

The signal is cut off during analysis (when the signal level is below the threshold value for 2 seconds or more)
This is a display indicating waiting for a signal.
Get Signal..

Displays that a signal that exceeds the threshold is detected when Sound Select is AUTO.
Lock ON.

If you touch it at the time of Get Signal, the analysis target point will be
Even if it locks and the signal is interrupted, it does not become in Waiting.
Press while locked for in Waiting.
Even if it becomes in Waiting, as soon as the threshold is exceeded
Since it becomes a Get Signal, it may not be visible.

[Sound Select AUTO OFF] (Manual Select)
Free Select Mode
You can manually select the analysis target by canceling AUTO with Sound Select. This status is displayed.
⑧▶
Sound Select Cursor
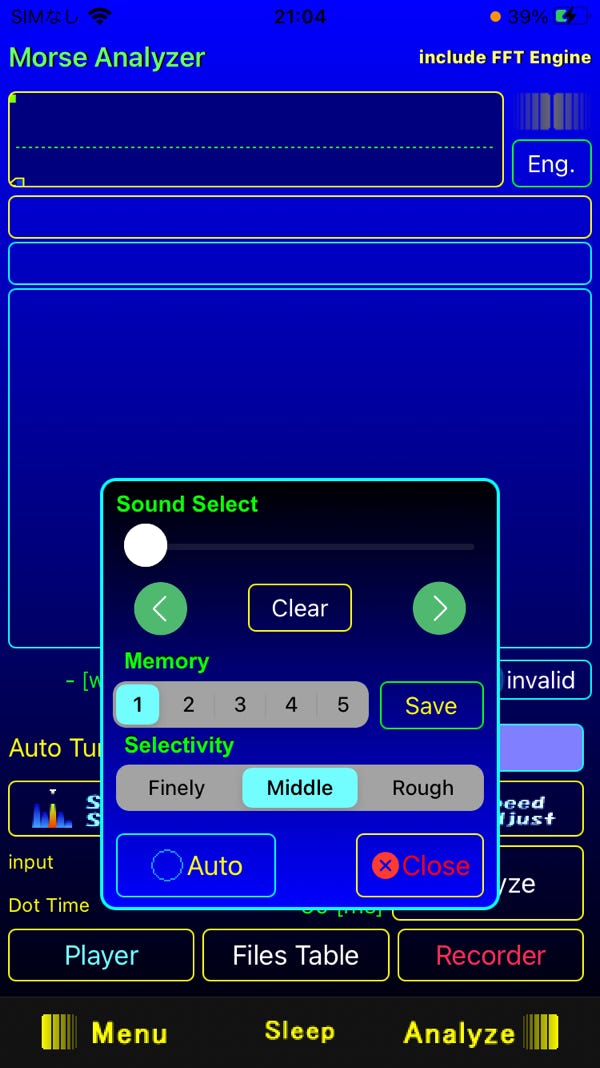
[Sound Select] Sound Select Control
Manual

Auto

Sound Select Slider

⑧ Automatic adjustment function display
Automatic adjustment function for analysis target points, sound pressure threshold, and Morse speed in the range
Sound select is a function that selects the sound to be analyzed from the range of sounds picked up by the microphone. Auto automatically targets the strongest notes that exceed the first threshold. It is a function to adjust manually when automatic detection is difficult, such as when the surrounding sound is stronger than Morse code such as games and sample sounds.
If you touch the sound selection button, it will automatically turn off and the graph will become a bar graph.
If you move the slider left or right, the cursor of the bar graph will be linked and you will be able to select the signal sound, so if you match it with the signal linked to the Morse code, that signal will be the analysis target. You can make fine adjustments with the left and right "<" and ">" buttons.
If you select it manually, the status bar will display "Free selection mode".
When you have finished selecting, click the Close button to close the dialog.
The selected position can be saved in 5 places.
Select the memory number first, decide the position, and press the save button to save.
Press [○ Auto] to change the mode to automatic mode and close the dialog.
Selectivity can change the selectivity of the FFT graph,
Finer: You can make finer choices, but it also increases the CPU load.
Medium: Usually, the selectivity is medium.
Roughly: The resolution is lower, but the CPU load is lower.
Finely
Middle
Rough


Sound Adjust Dialog
Manual
Auto
Manual
Auto
BufferMode Dialog

In Buffer Mode, Dot Time measurement is performed in the analysis process.
It will be done automatically.
There is no Auto button or manual setting. (Auto fixed)
[Sound Level] Sound level Controls


Sound Level Dialog


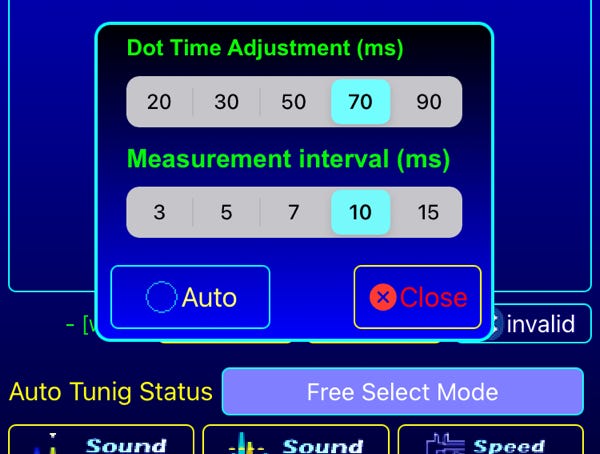
[Speed Adjust] Speed Adjustment
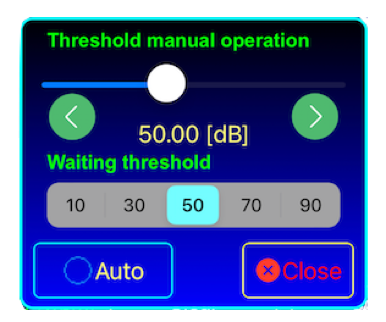
Sound level is a function that determines the on / off threshold of a signal.
The threshold setting value for distinguishing the short point and the long point by the on / off time is
It greatly affects the signal response.
However, the signal tends to be buried in noise, so you should always make fine adjustments while receiving the signal.
When set to [○ Auto], the appropriate value for the peak level is calculated automatically.
It also monitors the sound pressure level around the target signal and accurately reads the ON / OFF of the target signal.
Touch the sound level button to automatically turn off auto.
You can also set a "wait threshold" in this dialog.
The starting point where the waiting signal (waiting ..) changes to (Get Signal..)
Sets the signal level threshold.
Speed Adjust is a speed adjustment based on the length of the dot time.
Set the reference ON time for the dash.
If set to Auto, the appropriate value will be calculated and tracked automatically.
Morse code is not fixed length, so the speed depends on the character.
Therefore, there is a PARIS-WPM based on how many times a minute the "PARIS" string can be sent.
There is also a criterion that dashes correspond to three dots, so the character velocity can be calculated from the PARIS string based on the length of the dots.
However, this is just a mechanical story, and it is an unreasonable requirement for a dash to operate three times as much as a dot when a person actually hits it.
Therefore, WPM is ambiguous.
The measurement interval (ms) was added to Ver2.
The ON / OFF detection accuracy is improved by switching the signal detection interval.
When you want to analyze a high-speed Morse code that is difficult to analyze, reducing the value improves accuracy, but also increases the CPU load.
Also, if the analysis of low-speed Morse code is unstable, increasing the value may stabilize it.
Touch the speed adjustment button to automatically turn off auto.
⑪▶
⑨▶
▲
⑫
◀⑩
⑨ Display of input sound pressure to be analyzed, display of short point (Dot Time) during analysis
The sound pressure and threshold value of the analysis target point are displayed in the input.
If the analysis target is undecided, it will be displayed as --- [dB].
Similarly, Dot Time displays the setting reference value.
The standby reference value is set in the Sound Level Dialog.
⑩ "Analyze" button
It is a button to pause or resume analysis.
While stopped, the button turns gray and the status display becomes "Analyze OFF".
It also pauses when the Recorder Function is activated or the Faile Table is displayed.
⑪ "Menu" button
Moves to the Top Menu (function selection screen at startup).
⑫ "Sleep" button
Prevents the iPhone from automatically sleeping while using the app.
The display will switch to "NO Sleep". This function will be canceled when you switch screens or exit the app.
Note: Be careful not to run out of battery as it consumes a lot of energy.
⑬▶

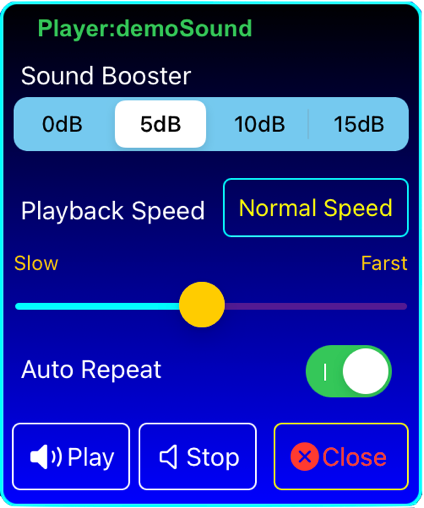
Playback analysis function
Play back the PCM digital data recorded by Recorder and analyze it into a character string.
You can also change the speed and sound pressure during playback.
Player Dialog
When the playback file is not set
Player: (nill) is displayed.
First select a file from the "File Table",
⑬ Recording analysis function
PCM digital data recording function

It is a function to record the analysis target once, play it back by changing the sound pressure and speed, and analyze it.
Previously, you couldn't analyze when you finished, but you can repeat it to perform a more powerful analysis.
You can also save the data and listen to it repeatedly so that you can use it for analytical practice with your own ears.
Since the recorded data is PCM data (digital), there is no deterioration.
Sound Booster (Sound pressure booster)
You can change the loudness of the sound.
Because the noise part also expanded, the peak of the waveform
It changes slightly flat.
Playback Speed Playback speed adjustment
It changes by about ± 20%.
Return to standard speed with the "Normal Speed" button.
If it is too late, there is a tendency to get lost in the analysis.
If the character string is not stable even after repeated playback
It may stabilize if the speed is increased.
“Auto Repeat” Switch
Repeats playback endlessly with ON
"Play" play button
Dialog closes when playback starts.
Playback is repeated endlessly.
"Stop" stop button
Stop playback and close Daialog.
By the time Dialog is closed due to termination processing
It will take some time.
"Close" Closes the Dialog.
Press during playback to stop and close Dialog.
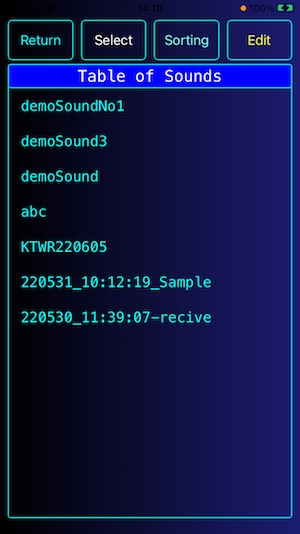
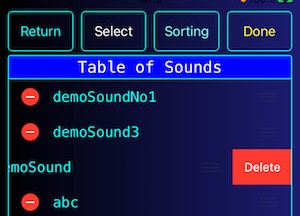
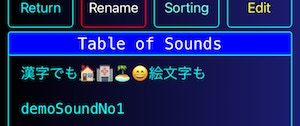
File Table Display
It switches with each touch.
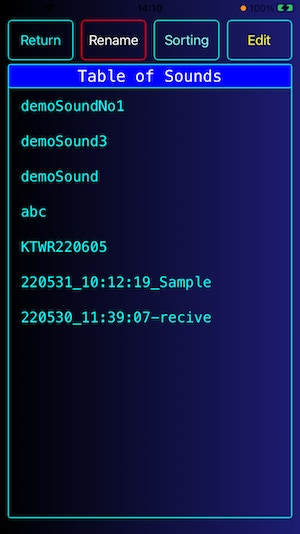
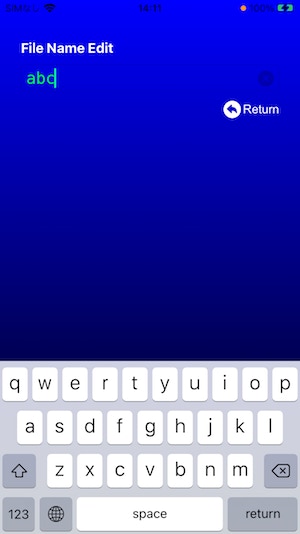
When a file is selected when [Rename] is selected
Moves to the file name edit screen

Edit Display
File function
It is a function to operate the recorded data file.
"Select" / "Rename"
It switches each time you press it, and the function after selecting the file name is different.
"Select" specifies the file to be played by Player.
"Rename" will move to the operation to change the file name.
If the changed file name already exists, it will not be rewritten.
The message "Rename Error same name already exists." Will be displayed.
Please change to a different file name.
Note: Do not use spaces in the file name.
"Sorting"
Each time you press the file name in ASCII order, it will be sorted in ascending / descending order.
Delete "Edit" file → Edit screen
It can be deleted in file units.
If you touch "Edit" to display the Edit screen, it will change to "Done".
When you select a file (touch the red minus)
"Delete" is displayed, so touch it to delete the file.
To finish the deletion operation, touch "Done" to return to the original screen.
NOTE
The characters that can be used in the file name are other than the alphabet
You can also use Chinese characters and pictograms.
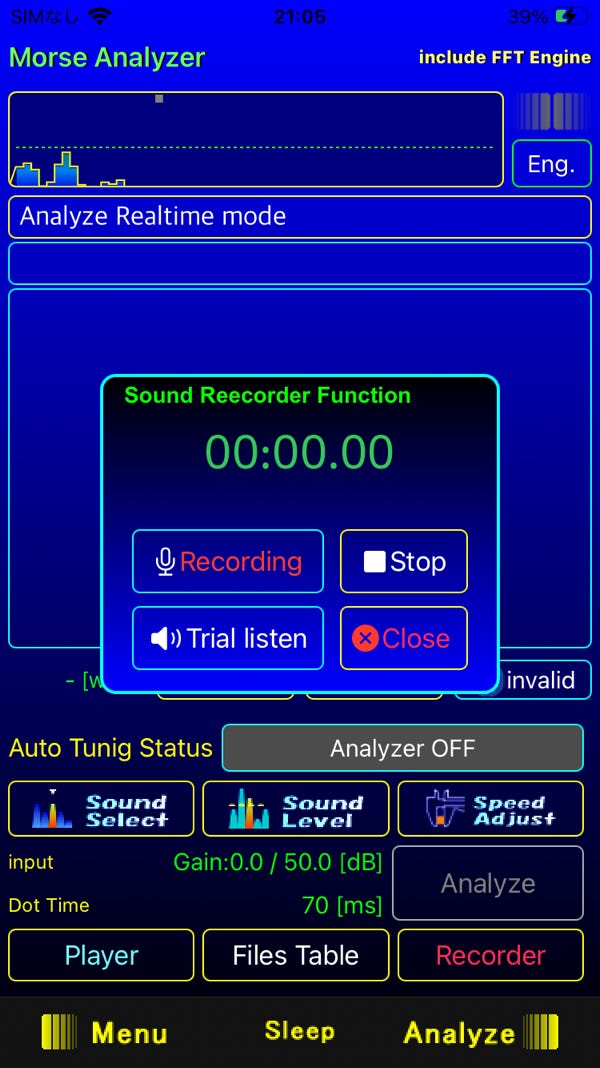
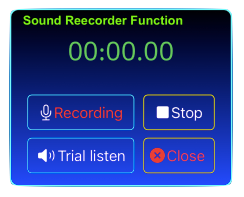
Recording Dialog (Recording)
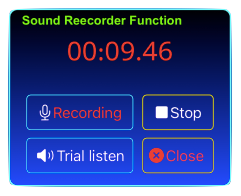

Digital recording function
Converts microphone input to PCM digital data and stores it.
Recording Dialog (Waiting)
"Recording" recording start button
Press during recording to stop.
"Stop" stop button
It will also stop during trial playback.
"Trial listen" trial play button
There is no analysis for this playback.
"Close" Closes the Dialog.
Press during recording to stop and close Dialog.
The recorded data is automatically recorded on the date and time of recording.
The information will generate a file name.
Example: In the case of May 25, 2022 15:45:24
It will be "250622_15: 45: 24".
When recording is finished, it will be the target file of Player
It will be set automatically.

It analyzes the sound (Morse code) picked up by the iPhone's built-in microphone and converts it into a character string. Velocity and sound pressure thresholds are adjusted automatically.
Initially, it was demodulated by the UV meter function of the iPhone, but with the UV meter function, the amplitude slowed down according to the actual sound, and even if the threshold was set, it was accurate enough to finally produce a fairly slow Morse code.
From the beginning of development, I thought that FFT (Fast Fourier Transform) could be used, but it was a complicated operation even though it was a high-speed transform, so I was wondering how much response I could get.
However, when I tried it with a prototype, I found that I got a much more accurate response than I expected, so I implemented an analysis engine using FFT in Ver.1.3 and officially released intelli-Morse. ..
Since then, there has been a growing trend from Morse code practice apps to Morse code analysis apps.
Regarding code analysis, the analysis accuracy with a simulator that can pronounce correctly in Morse code format is about 80 to 90%.
On the other hand, by hand, it is audible to the human ear, even if it does not fit the format correctly.
I devised an analysis algorithm to handle this. Not perfect, but much more accurate.
Once you have an idea, implement it, repeat the test, and reflect it in your product. (Secret algorithm ...!)
At the request of the amateur radio station director I knew, "I wish I had a recording analysis function."
Implemented recording analysis function and released as Ver2
Portal (normal) screen
①▶
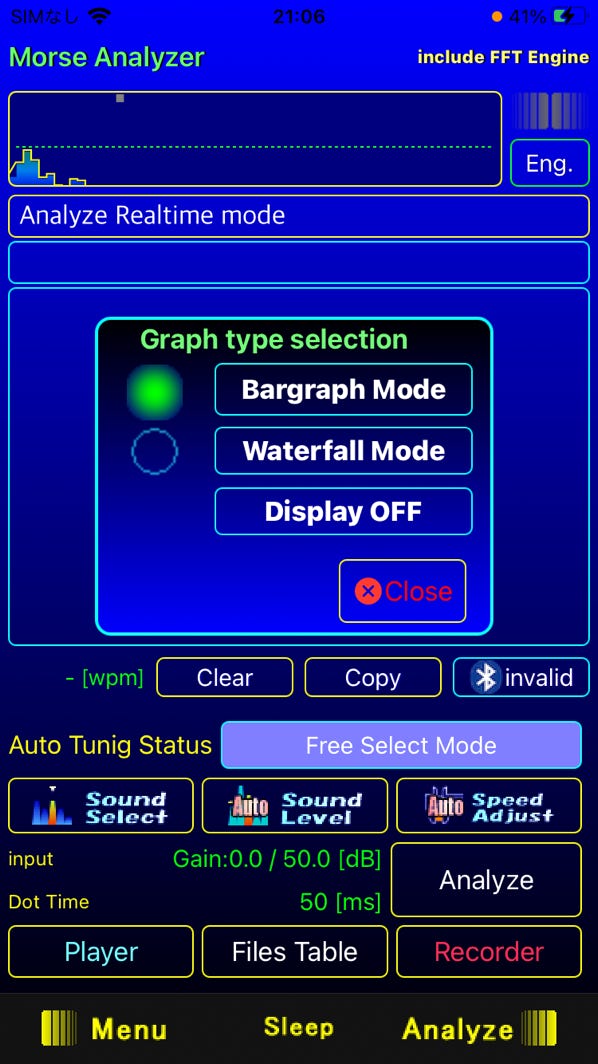
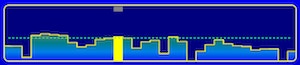
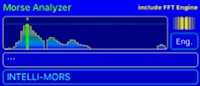
① FFT monitor
The audio signal input by the microphone is FFT analyzed and displayed as a range graph (low sound on the left side and higher sound toward the right).
Two types of graphs can be selected: bar graph display and waterfall.
Bar graph display
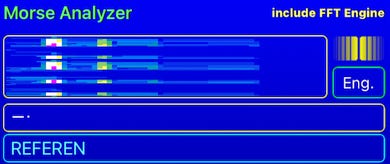
Waterfall display
Hide graph
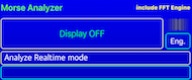
If you are concerned about CPU resource consumption If you want to focus on analysis by turning off the graph display, you can also reduce battery consumption.
The color changes in the vertical direction like a waterfall depending on the intensity of the flowing sound.
You can see the Morse code up to a certain speed.
Because it consumes more CPU resources than the bar graph
It may affect the analysis performance.
It is a portal display.
Use this graph when using the cursor in Sound Select to select the target sound.
You can switch the selectivity with the Sound Select Dialog.
There are two types of display switching
1. When you touch the FFT monitor, the switching dialog will be displayed.
You can select from the dialog.
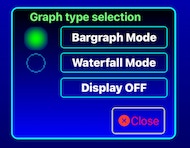
When you select the display mode with the button
It will fade out automatically.
2. You can switch between them by swiping the FFT monitor.
1) Right swipe → Bar graph display
2) Left swipe → Waterfall display
3) Swipe up → Hide graph (Display OFF)